Mastering The Art Of Ending Stitches On Your Sewing Machine
Ending stitches properly is one of the most important techniques to master when learning how to use a sewing machine. Knowing how to securely end a stitch on a sewing machine will give your sewing projects a professional finish and prevent unraveling over time. In this in-depth guide, we will explore the ins and outs of ending stitches, from the essential backstitch to alternatives like hand-tying threads. Follow along as we demystify this crucial skill!
Understanding End Stitches
An end stitch refers to the stitches made at the very beginning and end of a seam or line of stitching. These stitches are secured in place, rather than left loose, to prevent them from unraveling over time. An end stitch essentially locks the stitch so your hard work and effort doesn’t go to waste!
Ending stitches can be especially tricky when using a mini sewing machine that lacks a reverse stitch lever. Traditional sewing machines have this lever that allows you to seamlessly backstitch, while mini varieties require more creativity and practice. However, with the right techniques, you can master secure end stitches on any machine.

The Backstitch Method
The most common way to end a stitch on a standard sewing machine is with a basic backstitch. This involves simply reversing the machine’s direction to sew back over the previous few stitches. Here’s how it’s done:
Step-by-Step Backstitching
- Sew your seam as usual to about 3⁄4 inch (2cm) from the end.
- Press the reverse stitch lever/button on your machine. The exact location varies, but look for a button with a U-turning arrow.
- Make 3-5 small backstitches over the previous stitches. You can turn the hand wheel manually or use the foot pedal.
- Release the reverse lever and stitch forward again to the end.
- This locks the stitches securely in place!
Backstitching provides a quick, efficient way to secure stitching. The back-and-forth motion knots the top and bottom threads to prevent unraveling. Backstitches are slightly shorter than your normal seam stitch so they grab the threads more tightly.
Benefits of Backstitching
- Creates a firm, durable seam that won’t pull apart under tension
- Can be done seamlessly and quickly by machine
- Works for most fabrics and project types
- Creates little bulk, ideal for garment seams
For most standard sewing projects, backstitching is the ideal way to finish your stitches neatly and professionally. However, it isn’t suitable for every scenario, as we’ll discuss next.
Alternatives to Backstitching
While backstitching is a stitching staple, there are times when it may not be the best choice. Here are two effective alternatives for ending stitches without backstitching:
Tying Off Thread Ends
For lightweight or delicate materials, the bulk and tugging from backstitching could damage or distort the fabric. Instead, you can secure stitching by knotting the threads by hand.
Step-by-Step Thread Tying:
- Stitch your seam without any backstitching. Leave long thread tails at both ends.
- Tie the top and bobbin threads together in a square knot, tight to the fabric.
- For added security, thread the tails through a needle and weave between the stitching.
- Trim excess close to the knot or woven threads.
Hand tying creates a tidy, discreet finish. It works well for details like darts or gathering stitches where backstitching could cause puckering. The thread tails can be nearly invisible.
Adjusting Stitch Length
When you want to avoid bulk but don’t need the precision of hand tying, simply shorten your stitch length. Take the following steps:
- Decrease the stitch length to 1mm or less at the start of your seam.
- Stitch the seam as usual without backstitching.
- At the end, decrease the length again to make ~10 tiny securing stitches.
- Trim the threads close to the fabric.
The tiny stitches are very resistant to unraveling, providing an inconspicuous finish. This works well for techniques like topstitching.
Pros and Cons of Each Method
| Backstitching | Hand-Tying Threads | Small Stitch Length |
|---|---|---|
| + Fast & easy by machine | + Ideal for delicate fabrics | + Minimizes bulk |
| + Creates little bulk | + Very secure knot | + Subtle, professional look |
| + Secure against unraveling | + Handles puckering at darts | + Quick like backstitching |
| – Can cause fabric distortion | – More time consuming | – Less precise than hand-tying |
| – Adds bulk at ends | – Knots may show through sheer fabric | – Potential for some unraveling |
Choosing the Right Technique
So when should you use each of these techniques for ending a stitch? Here are some general guidelines:
- Backstitching – The standard for most seams and project types. Choose this if you want a quick, secure stitch finish.
- Hand-tying – Best for delicate and thin fabrics where backstitching could damage fibers. Also good for visible details like darts.
- Short stitches – Ideal when you need a clean, professional look as in topstitching. Minimizes bulk.
Specific factors to consider when deciding how to secure stitching:
- Fabric type and delicacy
- Visibility of the stitches
- Desire to avoid bulk
- Vulnerability to unraveling
- Your time constraints!
Get to know when to use each technique and you’ll have the versatility to end stitches flawlessly for any sewing scenario.
Other Helpful Ending Stitches
While backstitching and its alternatives cover most stitch ending needs, there are a couple other stitches that can help secure the ends:
Zigzag Stretch
Zigzag stitch settings on sewing machines allow the needle to swing side to side in a zigzag pattern. This versatile stitch has many uses, including:
- Encasing raw edges of fabric to prevent fraying
- Providing stretch and elasticity when sewing knits
- Adding decorative texture to projects
As the needle zigs and zags across the edge of your fabric, the angled stitching locks the threads in place without extensive backstitching. Just be sure to backstitch at the very beginning and end of your zigzag line for added security.
we Recommended using high quality sewing threads such as Coats & Clark Dual Duty XP All-Purpose Thread.
This top-rated general use thread works smoothly through sewing machines to handle straight, zigzag, and decorative stitches. The polyester/cotton blended construction has just the right amount of give and durability. Stock up on a variety of colors.
Straight Stitch
A simple straight stitch set to a short length can be used right at the edge of your fabric for an inconspicuous finish. The dense, tidy stitches prevent fraying and loosening.
This works well when stitching directly within a seam allowance, rather than as a decorative topstitch. Straight stitching is also perfect for sewing guide lines and following patterns.
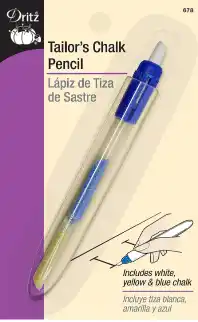
You can use Dritz Marking Chalk Pencil to make the sewing guide lines.

The ultra-fine chalk nib on this handy tool lets you trace perfect stitching lines for seams or quilting. The pencil marks easily wipe away after sewing. Comes in a variety of colors to match any fabric.
Lock Stitch
Some computerized sewing machines offer a specialized lock stitch for fast securing. This function stitches several stitches in place at the beginning and end of seams without you needing to backstitch manually.
Check your sewing machine’s manual to see if it has an automatic lock stitch setting. If so, this provides a quick, hassle-free method for ending stitches securely every time.
One of the best lock stitch sewing machine to use is the Singer Quantum Stylist 9960 Computerized Portable Sewing Machine.
This feature-packed sewing machine offers 600 built-in stitches including the lock stitch function. The automatic needle threader is a huge timesaver as well. Built-in lettering fonts allow you to personalize projects beautifully.
Conclusion
As you can see, properly securing stitching is vital for creating professional, long-lasting sewn projects. Not only does it provide functionality, but clean seam finishes elevate the look of any garment or craft.
While backstitching is the standard go-to, don’t be afraid to try the alternatives like hand-tying knots and adjusting stitch length when the situation calls for it. The more techniques you have in your arsenal, the more versatile you’ll be at ending stitches for flawless results on any sewing challenge.
So grab some fabric scraps, thread up your sewing machine, and get practicing! With some determination and these handy methods, you’ll soon be finishing stitches like a pro.
